Page 1 of 3
It is better with the pictures. but this is boat related
Posted: Mon Mar 09, 2009 1:07 am
by Louie
From: Martin Talbot <
talbot.martin@videotron.ca
The above "From:" address may be forged. Save Address Reminder
To: Scriver Mark <scriver>, Westwood Andrew <drewcanoe>, Mason Paul <pmp>, Rioux Ghislaine <gigioc1>, Lewis Michael <boatlouie>, Amaro Justine <justineamaro>,
basecamp@qc.aira.com
Subject: Pre-ALF Canoe Outfitting Extravaganza
Date: Sunday, March 8, 2009 5:31:12 PM [View Source]
I wanted the bottom of that SF to keep CONVEX in the water, not getting CONCAVE as it tends to...
Why?
i. It is nicer.
ii. It was designed to be that way.
iii. It calms my obsessive-compulsive mind.
iv. It might be more hydrodynamic.
And
v. it keeps a single man busy.
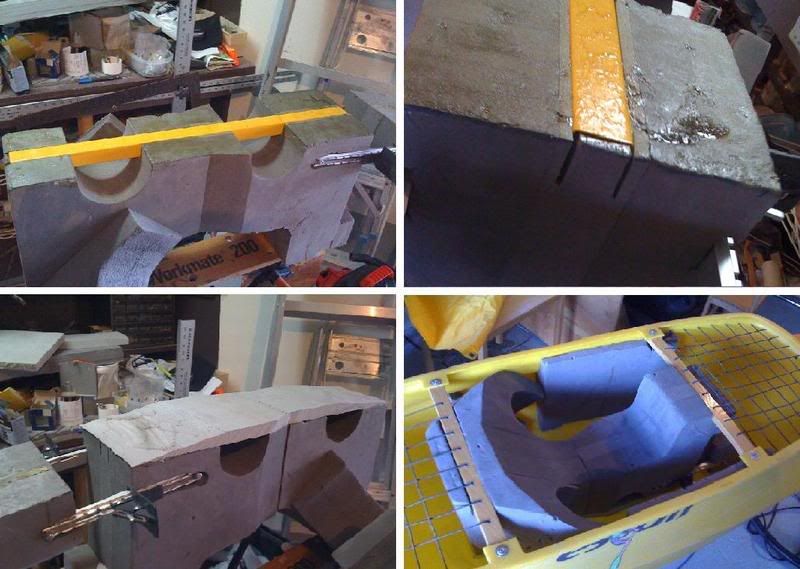
Start with an U-shaped steel bar (weight=450g or 1lb). Spray primer and rustproofing paint. Fit it in the base of a saddle.
A circular saw helps.
U shape insures maximal longitudinal rigidity to weight ratio.
Glue a layer of microcell on top of it all (on the bottom, in fact).
Use Mom's electric roastbeef knife to make it (approximately) fit the hull convexity desired.
Glue to boat. Tadaa!
To finish, customize looks with taste.
The steel bar stiffens the convex shape of the hull and transfers forces from under the center of the boat that tend to flatten it - or even make it concave - to both thwarts. The whole assemblage is quite under tension. A reasonable amount of force is necessary to put the thwarts back on.
Cannot wait to paddle the thing - see you in Tennessee!
SYOTR
==========
Martin Talbot
Posted: Tue Mar 10, 2009 11:08 am
by philcanoe
At first the idea of a creating a stress riser - sounded pretty goofy, and then the pics arrived...

A pic is worth a thousand words... looks like you've taken care of spreading the forces well. (I would be tempted to use aluminum or piece of sched40 pvc). One word of caution concerning about getting too much pressure. A few weeks ago I had a thwart snap upward, after running over a rock to get into a eddy. It was not a perfect thwart as grain was not all running inline; but was really pressed in overly hard. So there is probably a happy medium (somewhere).
Posted: Tue Mar 10, 2009 11:38 am
by the great gonzo
I would be a bit concerned about the tabs where the thwarts are attached to the hull, They look quite thin to me, and may well be the weak link now. I think I'd rather have the hull flex a bit than the thwart tab break.
TGG!
Posted: Tue Mar 10, 2009 12:44 pm
by Louie
You could just get a new boat, nuthin stay new for ever. Ask your girlfriend
Posted: Tue Mar 10, 2009 1:03 pm
by philcanoe
the great gonzo wrote:I would be a bit concerned about the tabs where the thwarts are attached to the hull, They look quite thin to me, and may well be the weak link now. I think I'd rather have the hull flex a bit than the thwart tab break.
TGG!
Just speaking for Pyranha S'Fly and Savage Skeeters....
...never have had a problem with thwart attachments, and these two are the same. Have had a couple or three or so occasions, where there was enough force to break thwarts and was no noticeable damage to these (major bow pins). One was hard enough to dislodge saddle and bulkhead completely, as in they were left floating. On another occasion a thwart simply broke, and bulkhead came loose. These were in addition to, earlier post (this thread) concerning breakage from bottom up. Have used this setup as a ladder to scout drops when creeking, with no problems or failures.
Posted: Tue Mar 10, 2009 1:10 pm
by the great gonzo
I recall having seen a few failed thwart attachment tab on CU-Flys.
TGG!
Posted: Tue Mar 10, 2009 1:20 pm
by philcanoe
Can only imagine what the repetitive stresses from playboating are doing - good to know!
Wonder if thwart length comes into play? Imagine if shorter ones are used there will be more play (cyclic loading), while if they are as long as possible - then there might be less flex? ((... just thinking out loud))
Posted: Tue Mar 10, 2009 3:49 pm
by Craig Smerda
nice work... but here's my two cents...
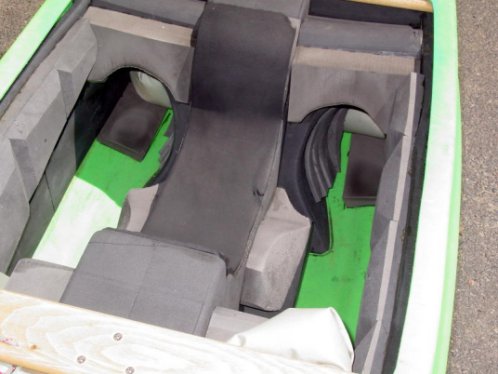
i don't like nor am i a fan of water transfer cut-out notches at the base of the saddle... that's why i prefer to install pvc pipe transfer tubes about 4-5" above the saddles base height. keeping the saddle's base intact affords a little bit of upward hull flex while going over rocks, trees, kayaks or??? as too much rigidity in the base of the saddle or in one specific area will most likely crack the hull at the closest point without rigidity rather than allowing a bit of flex to transfer through the saddle.
also... making the saddle's base wider by adding foam to the sides of it where it meets the hull gives you more structure and less likelyhood to crack the hull. all of the broken rotomolded canoes i've seen crack do so right next to the outside edge of the saddle as this is the highest stress point. the greater the surface area of saddle to absord stress you can have the less likely it is in my opinion for the hull to flex upward and crack or oilcan.

this was a fairly decent discussion from BT talking about why kayaks crack...
http://boatertalk.com/forum/BoaterTalk/1425641
if a canoe is going to crack it's hull due to stress it will most likely be under the cutouts or right alongside the saddle... so while you now have a stiffer saddle by adding a spine you still have two area's right alongside of it that can be stressed and could potentially break as well as alongside of the saddle itself.
(this isn't super easy for me to explain... maybe i'll draw a couple pictures)
edit... does this make sense?

Posted: Tue Mar 10, 2009 4:17 pm
by cmnypny
Geez Craig ... that looks like a cadilac in terms of outfitting.
ummm .... one question ... where is the beer can holder?
Posted: Tue Mar 10, 2009 4:18 pm
by philcanoe
exactly...
which is why I glue/place sections of 3 or 4 inch PVC pipe - into my saddle cut outs... however I feel he did a good job - buffering the steel, with his saddle... still don't know why just more foam alone would not have worked
and yes, that's exactly where my plastic welding friend sees failures - been at his house and seen a bunchof broken hulls... and like you said, it's the same for canoes
Posted: Tue Mar 10, 2009 4:32 pm
by Craig Smerda
philcanoe wrote:exactly...
which is why I glue/place sections of 3 or 4 inch PVC pipe - into my saddle cut outs... however I feel he did a good job - buffering the steel, with his saddle... still don't know why just more foam alone would not have worked
and yes, that's exactly where my plastic welding friend sees failures - been at his house and seen a bunchof broken hulls... and like you said, it's the same for canoes
putting in the semi circle pipe prevents the saddle from breaking but if you are notching the bottom of your saddle for water transfer it
still allows the hull to can inwards when going over the lip of a ledge or over a rock... and
that's when the stress on the hull takes place... do it enough times or hard enough once and the hull stretches inwards and breaks. from my experience a little water sloshing around in the bottom of the boat doesn't matter much until you get up to about 3-4" on one side.
use transfer tubes higher up... and make a couple wedges to widen the saddle where the bulk of your weight is.
(i just get some 2" i.d. pvc tubing then push and twist it into the saddle so it cuts it's own hole until it get's to the other side... then pull out the foam plug from inside the tube... slap a little contact cement on the tube after you've cut it to the proper length and stick it back in... and your done. the tube keeps the saddle rigid.)
Posted: Tue Mar 10, 2009 4:37 pm
by Craig Smerda
cmnypny wrote:Geez Craig ... that looks like a cadilac in terms of outfitting.
ummm .... one question ... where is the beer can holder?
 http://kayakoutfitting.com/tips/wwcanoe/index.html

Posted: Tue Mar 10, 2009 4:42 pm
by gumpy
if a canoe is going to crack it's hull due to stress it will most likely be under the cutouts or right alongside the saddle... so while you now have a stiffer saddle by adding a spine you still have two area's right alongside of it that can be stressed and could potentially break as well as alongside of the saddle itself
Is this an issue with royalex canoes too? or just PE?
Posted: Tue Mar 10, 2009 4:48 pm
by Craig Smerda
gumpy1114 wrote:if a canoe is going to crack it's hull due to stress it will most likely be under the cutouts or right alongside the saddle... so while you now have a stiffer saddle by adding a spine you still have two area's right alongside of it that can be stressed and could potentially break as well as alongside of the saddle itself
Is this an issue with royalex canoes too? or just PE?
not as much with royalex... then again the entire hull on a royalex boat flexes all over the place for the most part and i haven't seen many people tie a bulkhead style saddle system into the hull on a royalex boat the way it's done with a rotomolded boat.
what i do see happen in royalex boats with a saddle is this in time... the hull wears through just in front of the saddle where all the paddlers weight rests and there is no support.
remember that water weighs roughly 8lbs per gallon... take your weight and figure out how many gallons of water can fit inside the boat with you in it... then add 8lbs of stress for every gallon of water to your weight. the more foam you can add the more water you can displace... the more water you can displace the less weight in the boat... the less weight in the boat the easier it is to control when running "wet" to the gunnels and dumping isn't an option. this comes especially in handy when playboating or creeking where "dumping out" isn't availible. we performed a test in AUS a few years back and you'd be amazed at how much water even a little playboat can hold.
give this a read...
http://www.cboats.net/cforum/viewtopic. ... ght=#11515
personally... after using a bulkhead for so long i would never go back to a saddle and strap system... but that's just me... mileage may vary for others.
Posted: Tue Mar 10, 2009 5:13 pm
by Louie
I have been usin (2) 3" pieces of PVC pipe all the way back to the Encore day, that was before you started boatin there Yankee boy and Phil wasn't any good. I cut the 3" PVC pipe on a badn saw so it is no longer a circle but a cresent only having taken about a sixth of the circle away this privide a flat surface for the pipe to rest again the bottom of the boat and allow for total water transfer, but hey I've only been doing it since the late 80's so what do I know.


